The Ultimate Guide to Setting Up Your Guinea Pig's Cage
Welcome to the exciting world of guinea pig care! If you're looking to create the perfect habitat for your furry little friend, you're in the right place. A properly set up cage can lead to tons of popcorns (those joyful little jumps your guinea pig does when they're really happy) and wheeks (their adorable way of vocalising excitement).
So, how do you get started? Let’s dive in!
C&C – Your New Best Friend
When it comes to guinea pig cages, one name stands above the rest: C&C. No, it’s not a secret code - C&C stands for Cubes and Coroplast. Here’s why it should be your go to solution:
-
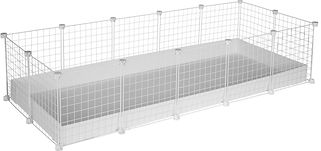
Cubes (Metal Grid Panels 35cm x 35cm): These metal grid panels form the walls of your guinea pig's home. They’re sturdy, customisable, and you can easily adjust the size of the cage as your guinea pig grows or as your space changes. Plus, they provide plenty of airflow.
-
Coroplast (Corrugated Plastic Sheets): This is the material used for the base of your guinea pig's cage. It’s durable, waterproof, and simple to clean. No more worrying about bedding getting stuck in the corners or dealing with messy spills. You can even cut the Coroplast to fit your design!
Why choose C&C? Well, for starters, they offer a customisable, easy to clean and spacious environment for your guinea pig. These cages can be made to fit any size living space, and because they’re so open, your guinea pig will have plenty of room to roam, explore, and of course, popcorn around in joy.
Size Guide
When it comes to guinea pig housing, space is key! The more room you can provide, the happier and healthier your guinea pig will be. Click here to see the MINIMUM size for a C&C cage.
Getting it Set Up
Now that you’ve got your C&C structure in place, it’s time to get the inside of the cage ready.
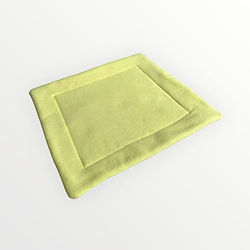
Step 1: Add the Absorbent Liner (Base layer)
It’s time to create a comfy, absorbent foundation for your guinea pig’s cage. For this, I like to use a cotton liner as the base layer.
Cotton liners are a great option because they offer light to medium absorbency while being super easy to clean. One of the things I love about them is that they prevent hay from getting stuck like it often does with fleece. This makes it much easier to keep the cage tidy and it only needs to be switched out once a week.
Step 2: Add Pee Pads to High-Traffic Areas
Guinea pigs have their favorite spots, usually by their food, in their hidey houses, or their favourite chilling spots (look where they tend to potty). These areas tend to get a little more... fragrant than the rest of the cage. To keep things fresh and clean, add pee pads (check them out here) in the high traffic spots.
You’ll want to swap these out 2-3 times a week depending on how active and social your guinea pig is. Pee pads are super handy for cutting down on cleaning time and preventing moisture buildup, which is especially important if you’re using fleece liners.
Step 3: Set Up Their Food and Water Stations
Hay: Guinea pigs should always have access to unlimited hay. You can place a large pile of hay in a low litter box they can easily walk into. This will encourage them to munch throughout the day.
Pellet dishes: Use low dishes for pellets. This helps prevent them from knocking over their food and makes it easier for them to access. Make sure to refill their pellets daily, as guinea pigs eat a lot!
Water: While many guinea pigs are used to drinking from a water bottle, some prefer a bowl. I recommend providing both. A water bottle for easy access and a water dish for a more natural drinking experience.
Step 4: Add Enrichment
Tunnels and hides: Guinea pigs love to hide and explore, so make sure you include a few tunnels and hidey houses. They’ll appreciate having cozy, safe places to retreat to when they want to rest or feel a little shy.
Toys and chews: Add a variety of toys to keep your guinea pig entertained. You can use stacking cups that they can knock over, natural chew toys made from wood, or even cardboard boxes they can rip up. The more variety, the better!